


AI has presented profound opportunities for digital artists to approach the creative process in whole new ways, whether you're looking to remove an image's background or dream up fantastical imagery using AI art generators.
Generative Fill is a similarly innovative design tool that significantly reduces the time and effort required for various tasks, thanks to the power of Adobe Firefly, a family of generative AI tools developed for Adobe products.
In this article, we'll explore more about what Photoshop Generative Fill can do, how to access it, and how to make the most of its features.
What is Photoshop Generative Fill?
Generative Fill is an AI image editing tool powered by Adobe Firefly that enables users to add or remove content from images using text prompts as the primary input.
Whether you aim to remove an unwanted object from a photograph, replace a background, or create intricate patterns and textures, Generative Fill can do it with remarkable precision and speed.
The underlying power of the tool lies in its AI-driven algorithms. When a user selects a specific region within an image, the AI analyzes not only the content but also the broader context of that area. This analysis enables it to make intelligent decisions about what content should be generated to seamlessly blend with the existing image.
It fundamentally changes the game by automating design-intensive tasks that, in the past, demanded manual, time-consuming effort.

How to access Photoshop Generative Fill
In order to access Photoshop's Generative Fill feature, you will need a Creative Cloud subscription, and the latest beta version of Photoshop installed on your device.
Once you have purchased your subscription, just follow these simple steps:
1. Open Photoshop (Beta)
The first step to using Generative Fill is to launch Photoshop Beta. Photoshop (Beta) is currently the only version of Photoshop that includes the Generative Fill tool.
2. Create a custom canvas
Once inside Photoshop, you have the freedom to create a new image file tailored to your vision. Whether you're designing for print or web, this step allows you to set the canvas dimensions that perfectly suit your project.
3. Import your base image
Next, import your chosen image into the canvas. This base image will serve as the foundation upon which you'll apply generative edits. Pick an image that aligns with your creative objectives, whether it's a photograph, digital artwork, or anything in between.
4. Select your editing area
Now, let's pinpoint the area you want to transform using the Generative Fill.
The Rectangular Marquee Tool, represented by a dotted box icon, lets you define a specific region within your imported image. This precision ensures your edits are focused to a specific region within the image. Alternatively, you can select the entire image.
5. Use the Generative Fill tool
Located conveniently on the floating toolbar just below your selected area, here is the star of the show.
Click on “Generative Fill” to begin entering a prompt.

6. Enter a prompt
Before you hit "Generate," you have a choice to make. You can guide the AI by entering a specific prompt that aligns with your creative requirements, or you can leave it blank and welcome the element of surprise as Photoshop generates random additions to your selected area.
7. Review changes
Once the generative editing is complete, you're presented with a range of options and variations for your selected area. Use the left and right arrows on the floating toolbar to cycle through these options, giving you the freedom to choose the perfect enhancement that aligns with your creative vision.
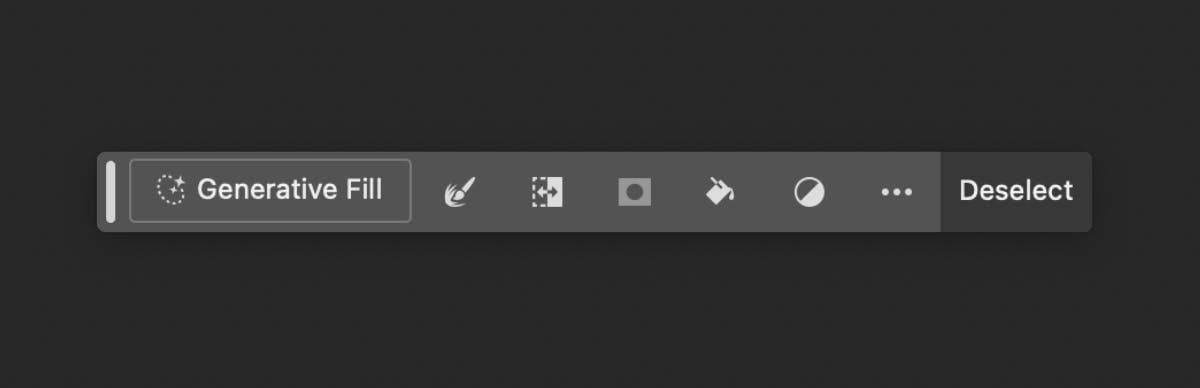
Where to find Photoshop AI Generative Fill
Accessing the Generative Fill tool on Photoshop is quite straightforward.
First thing to note: There is a floating taskbar that is present as soon as you upload an image on Photoshop. The settings of the taskbar are different when you have the image selected vs. when you don’t.
For the purposes of this article, we will only discuss the options available in the taskbar when you do have a subject selected:
Generative Fill: This feature allows you to input text prompts, and Photoshop uses AI to generate images based on those prompts. It's a creative tool that can produce various visuals based on your textual input.
Selection Tool: The selection tool is used for making precise selections in your image. You can manipulate these selections by adjusting their borders, expanding or contracting them, feathering (softening the edges), or smoothing them to achieve more refined results.
Invert Selection: Instead of selecting the pixels within your initial selection, inverting the selection will choose the pixels outside of your initial selection. This can be useful for editing the surrounding areas of your selection.
Transform Selection: This allows you to apply transformations to your selection, such as scaling, rotating, or skewing it. It's handy for precisely positioning your selected area.
Mask Selection: Creating a mask from your selection lets you control the visibility of certain parts of an image, which is especially useful for non-destructive editing.
Create a New Adjustment Layer: Adjustment layers are used to apply various adjustments, such as color corrections or filters, to your image without directly altering the original image layer. This provides flexibility in editing.
Fill Selection with Color or Gradient: Once you've made a selection, you can use this option to fill the selected area with a solid color or a gradient, allowing for creative effects and adjustments.
Toolbar Positioning Settings: These settings allow you to customize the positioning of your toolbar, making it more convenient for your workflow. You can choose to dock it to different sides of your workspace.
Deselect Selection: After making a selection, you can use this option to remove the active selection, allowing you to work on the entire image again or make a different selection.
How to use Generative Fill in Photoshop
Now that you've accessed the Generative Fill tool and explored its features, let's dive into ways it can be used effectively.
Here are three key use cases of generative fill:
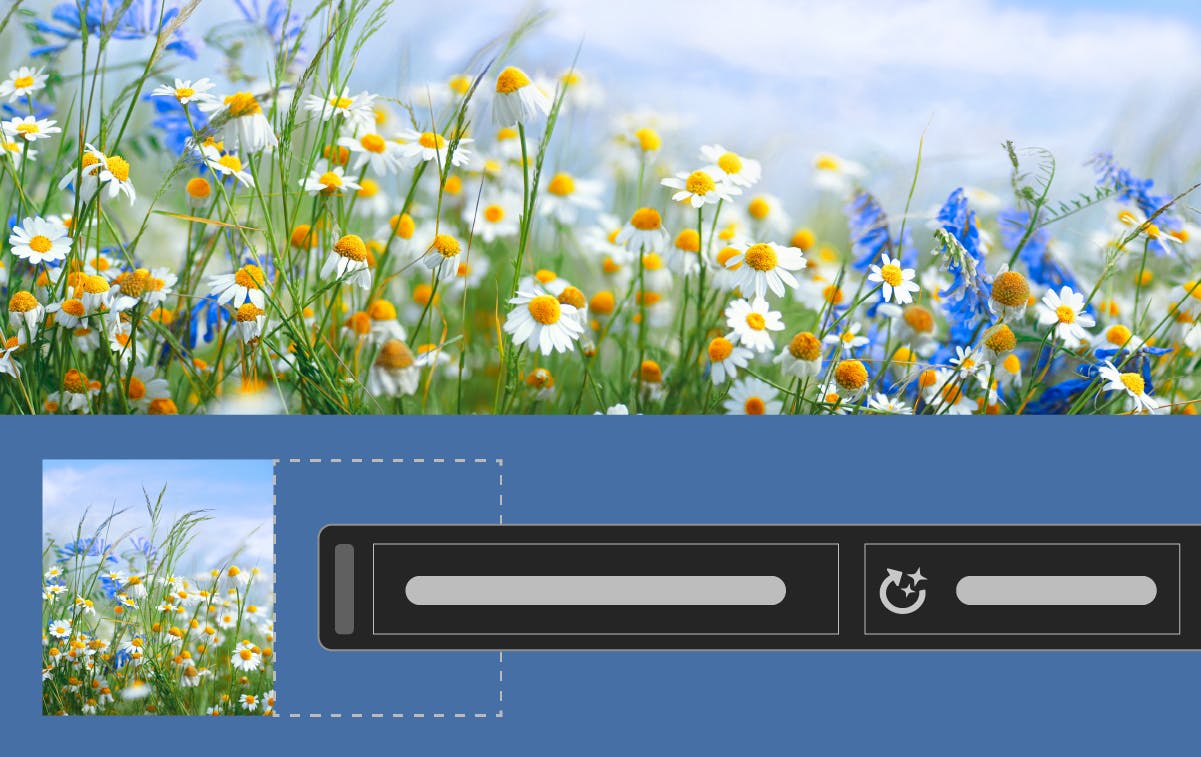
Using Generative Fill to extend images on Photoshop
1. Open your image
Launch Adobe Photoshop and open the image you want to extend. Go to "File" > "Open" and select your image.
2. Select the area to extend
Use the selection tool of your choice (e.g., Marquee, Lasso, or Pen tool) to outline the area you want to extend. This could be the sky, a landscape, or any part of the image you want to make larger. Drag the selection over white areas of your canvas.
3. Enter prompt
Once you have selected the area you wish to extend, you can input a prompt in the Generative Fill taskbar. For this particular example, you can leave it blank, and the AI will contextually extend the image. Finally, press “Generate” and Generative Fill will take care of the rest.
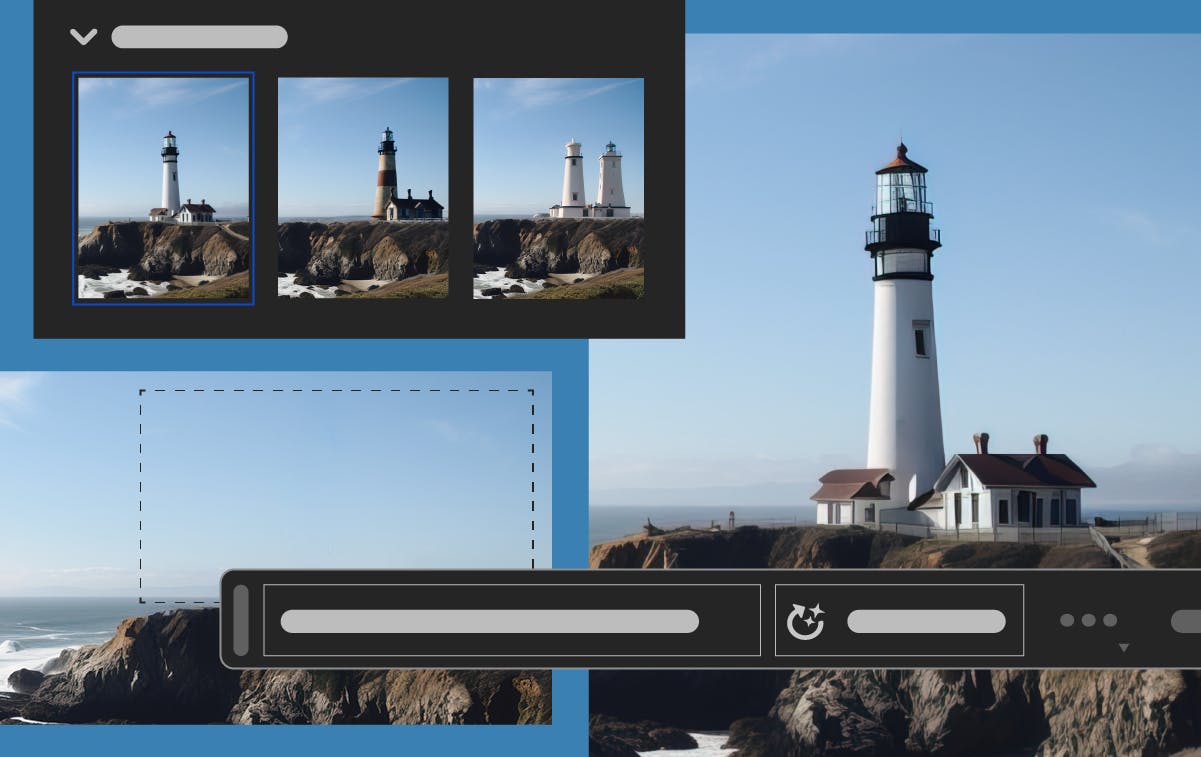
Using Generative Fill in Photoshop to add realistic objects to your image
1. Open your image
Launch Adobe Photoshop and open the image to which you want to add realistic objects. Go to "File" > "Open" and select your image.
2. Select the area for the new object
Use a selection tool like the Marquee, Lasso, or Pen tool to outline the area where you want to add the new object. Ensure that the selection area is appropriate for the object's placement and size.
3. Enter prompt
Once you have selected the area you want an object inserted into, you can input a prompt in the generative fill taskbar.
For example, if you want to add a lighthouse to an image of a cliff, you can enter “white lighthouse” in the generative fill text box. The generative fill tool will then create the object you have entered.
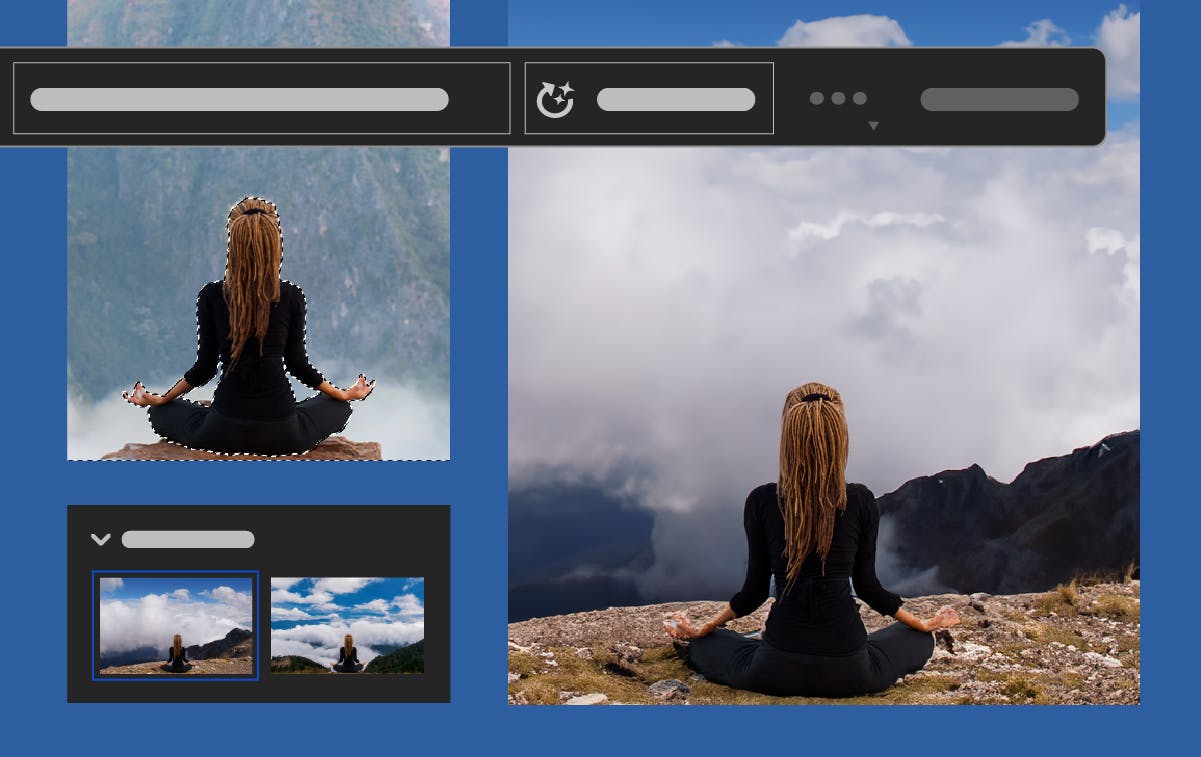
Using Generative Fill in Photoshop to create backgrounds
1. Open your image
Launch Adobe Photoshop and open the image to which you want to add realistic objects. Go to "File" > "Open" and select your image.
2. Select your subject
Use a selection tool like the Marquee, Lasso, or Pen tool to outline the area that contains your main subject. This is the part of the image which will remain the same, while everything around it (i.e. the background) will be changed.
3. Click on “Invert Selection”
In the taskbar, select “Invert Selection” and Photoshop will select everything except for the subject you initially selected.
4. Click on Generative Fill
Next, click on the Generative Fill button and enter whatever background you wish to change to. Finally, press “Generate” and the AI will transform the background accordingly.
What to do if Photoshop Generative Fill is not showing up
If you can't find the Generative Fill option in Photoshop, ensure that you have the latest version of Adobe Photoshop installed on your computer.
Adobe regularly releases updates with new features and improvements, so updating your software should resolve this issue.
Currently, Generative Fill is only available on the Beta version of Adobe Photoshop, so double check to ensure you are using that version.
Additionally, you will need to subscribe to an Adobe Photoshop membership. It is also worth noting that Generative Fill is not available in China at all, so if you belong to that region you’re out of luck at the moment.